

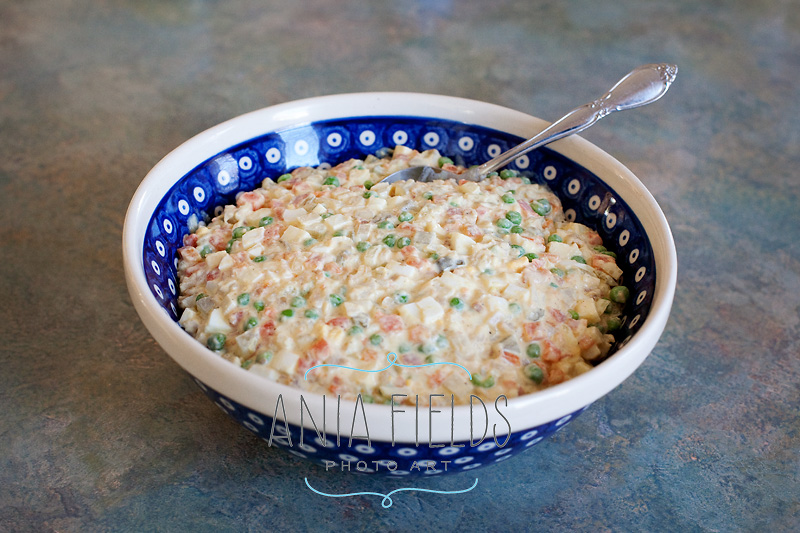
Today I’ll share with you how to make traditional Polish vegetable salad (salatka jarzynowa). This is a super easy and very popular Polish side dish. You can see it on almost every table at Christmas, Easter, wedding or any other family get together. This was also one of the first dishes that I learned how to prepare and I remember making it myself for my 9th birthday party. Now my kids like to eat it, too and happily help me with all the chopping. This salad is also our staple for most potluck parties. It always gets raving reviews among my American friends who often ask me for a recipe. So I thought it would be easier if I’d share how to make Polish vegetable salad recipe here. The main ingredients in this dish are typical for the Polish cuisine root vegetables. I often make soup stocks and I re-use veggies from the stock to make my salad, but you can also boil them just for this dish.
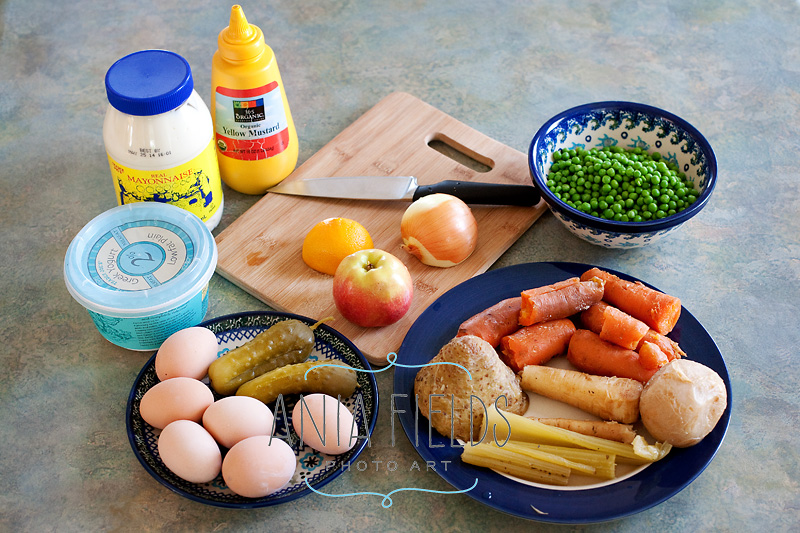
INGREDIENTS:
a selection of scrubbed, cooked and cooled root veggies:
- 3-4 carrots
- 1-2 parsnips
- 1/2 of medium celeriac
- 1 celery stalk
optional: small turnip OR small rutabaga OR 1-2 potatoes
- 2-3 pickles – I use my lacto-fermented pickles in brine, you could also buy Bubbies or Nathan’s half sour pickles, but if you can’t find those then any dill pickles will work as well
- peeled apple
- 4-5 hard boiled eggs
- small onion or small leek
- 1-2 cups sweet peas – traditional way is to use drained canned peas, but I personally prefer using frozen, I just put them in a sieve and run warm water over the peas for a while to thaw them
- about 1/2 cup mayonnaise
- 1 tablespoon yellow or Dijon mustard
- salt and pepper
- lemon juice
Optional: 1-2 tablespoons sour cream or plain yogurt
HOW TO MAKE POLISH VEGGIE SALAD:
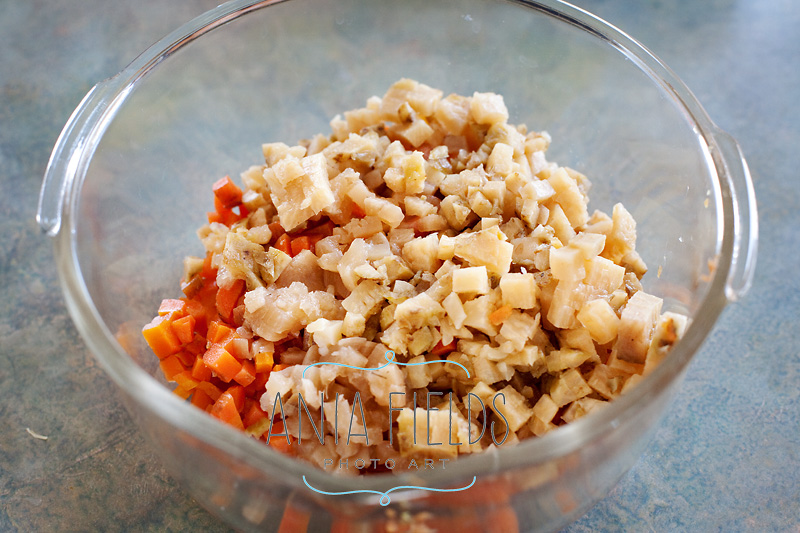
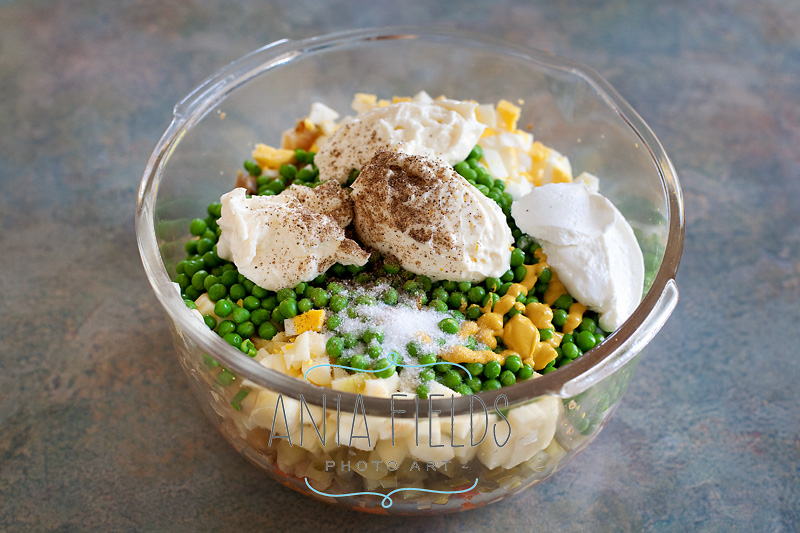
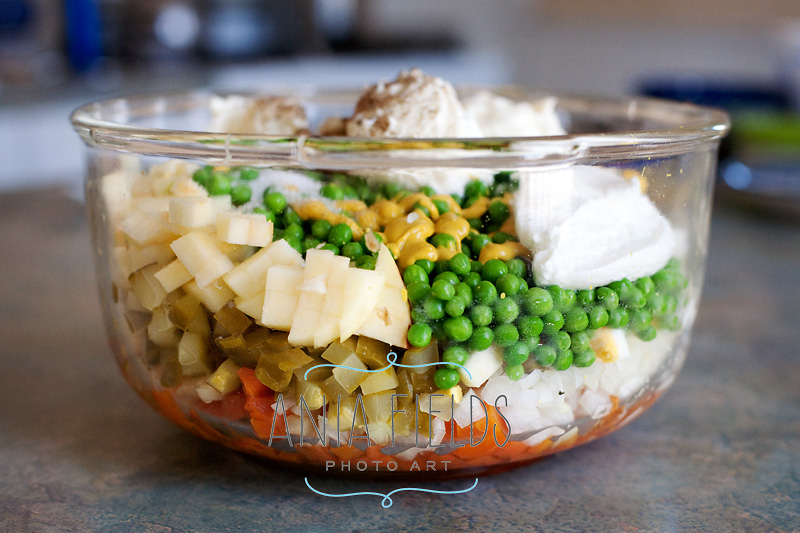
1. Dice all the veggies, pickles, eggs, onion and apple (I like to make small and even cubes, not larger than a green pea) and add everything to a large mixing bowl


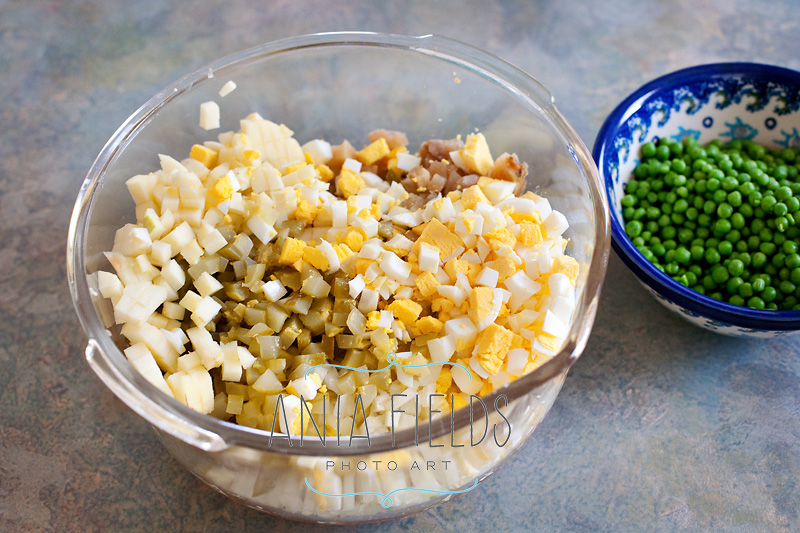
2. Add peas, mayo, mustard, salt and pepper, a little lemon juice and optionally plain yogurt. Here I added three large spoonfuls of mayo and one of yogurt:
3. Mix everything carefully (so it doesn’t turn into mush) in a bowl and taste it!
Too dry? – Add more mayo.
Too bland? – Add more pepper.
Not enough kick? – Add more mustard or pickles or lemon juice.
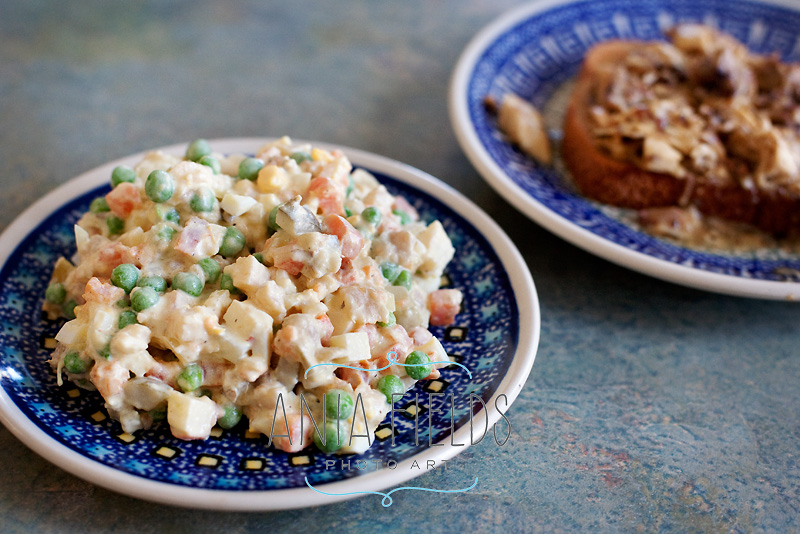
4. When you’re happy with how everything tastes put the salad in the fridge so that all the flavors can combine. It tastes best on the second day and you can keep it in the fridge for several days. Since you can prepare it a day ahead it makes it very convenient for potlucks or holidays. With this recipe you’ll end up with a huge bowl of salad. More than enough to share with lots of people.
Today I made the salad and Stuart made a chicken and gravy toast. It was a perfect combination for our lunch. 🙂 I don’t think I’ve met anybody who didn’t like this Polish vegetable salad and A LOT of people just love it. I can almost guarantee that you’d enjoy it as well. Try it and let me know what you think.
click here to check out more delicious recipes
come visit my website
say hello on Facebook
call me: 608-643-2642


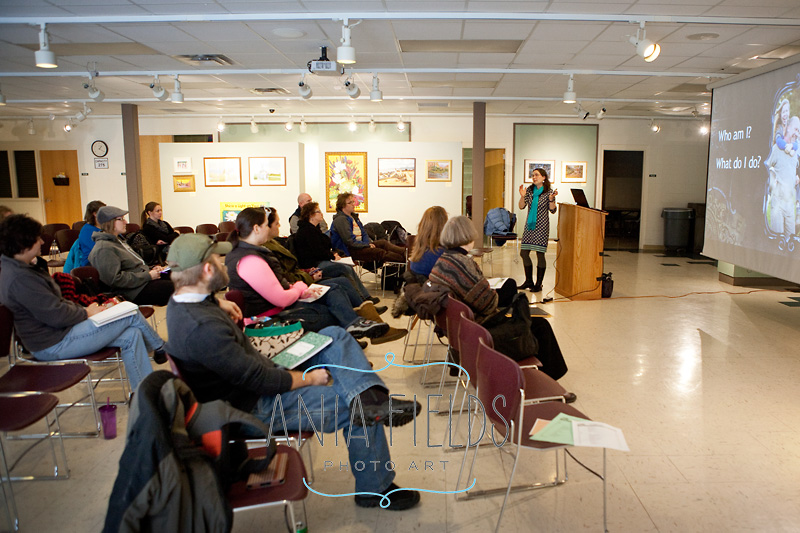
I’m a little late with this post, but better late than never 🙂 Two weeks ago I delivered a photo workshop at River Arts Center in Prairie du Sac, WI which was part of a winter photo contest event they organized. Even though it snowed a night before, I was super happy to see 14 people show up for the class. And afterwards they all said that they did learn something new! Here is a couple of photos taken by my husband during the class:

Looks like we are going to have another cold and snowy weekend. If you don’t have any plans for this coming Sunday afternoon (Feb 9th), I’d like to invite you to River Arts Center for another fun event. As I mentioned, this winter River Arts Inc. conducted a photo contest for the members of the Sauk Prairie community. Lots of people submitted photos in both adult and youth categories. The results were amazing. Clearly, Sauk Prairie is surrounded by talented artists! The 18 photos selected will be printed and framed and given to the photographers with a chance to win a $50 cash prize. You can help choose the winner by attending a free public reception. This exhibit is in conjunction with The Photography of Mike Murray, a professional photographer from Madison and the Wisconsin Regional Art Program representing the best of Wisconsin’s non-professional artists. With catering by the wonderful Maria Van Cleve and an interactive photo booth by Finer Fotos, this is sure to be a fun event! Put it on your calendar and bring friends and family. I hope to see you there on Sunday!
WHAT: River Arts Center Public Reception
WHEN: Sunday, February 9th, 2014 from 1-3pm
WHERE: River Arts Center lobby, 105 9th St, Prairie du Sac, WI

come visit my website
say hello on Facebook
call me: 608-643-2642

Today I’d like to share with you a recent fun kitchen experiment making kombucha scoby dog treats. Our Morty really liked them so they must have turned out pretty good and I’m sure I’ll make them again. You might already know that several years ago I started brewing kombucha at home (if you don’t know what kombucha is or would like to learn how to make this drink you can check this post I wrote earlier). Brewing a homemade kombucha is an easy process, my family loves the results and we have been drinking it regularly. With every new batch of kombucha you get one new kombucha scoby – a symbiotic culture of (beneficial) bacteria and yeast. Even though scobys are full of beneficial stuff they are not really edible. I know because I tried to stir fry some with spices. 🙂 They tasted great but were more like a chewing gum than food. Now I usually save one or two, just in case a friend wants to start brewing ,and the rest ends up in our compost pile. Last month I felt like experimenting and decided to create dog treats out of my five extra cultures. If you want to learn how to make your own kombucha scoby dog treats keep reading…
Here is how my kombucha cultures (scobys) looked before the experiment:

First I put them into a dehydrator for several hours until they were drier and thinner but still pliable:

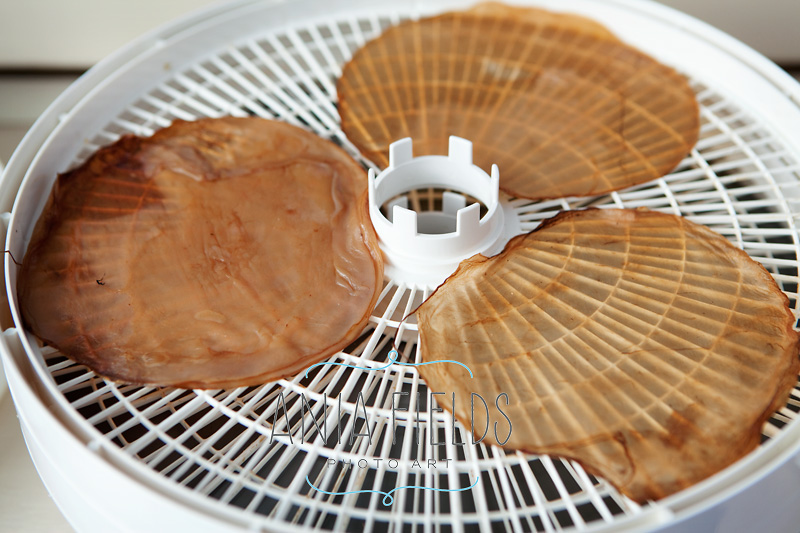
Then I rolled them up and dehydrated for a few more hours until they got really dry and stiff:

Finally I dipped three of the dried rolled up scobys in bacon grease to add some flavor and dehydrated a little more. I didn’t soak the rolled up treats completely in the grease. Just enough to add nice smell for the dog. I’m sure that roasted chicken, hamburger or whatever other meaty flavor would work as well, we just happened to have some bacon that day. When the rolls dried a little I gave one scoby dog treat to our dog and he immediately took it to another room and started working on it. Within a few moments it was all gone. Good that I had my camera ready to capture that!

Morty loved his bacon flavored kombucha dog treats, but didn’t care too much for the plain ones. I guess I’m not surprised as they are pretty bland and don’t have much flavor. Next time I make these probiotic treats I’ll experiment with different flavors and maybe also different shapes. If you have any other ideas what to do with extra kombucha scobys, please share in the comments below.
click here to check out more delicious recipes
come visit my website
say hello on Facebook
call me: 608-643-2642

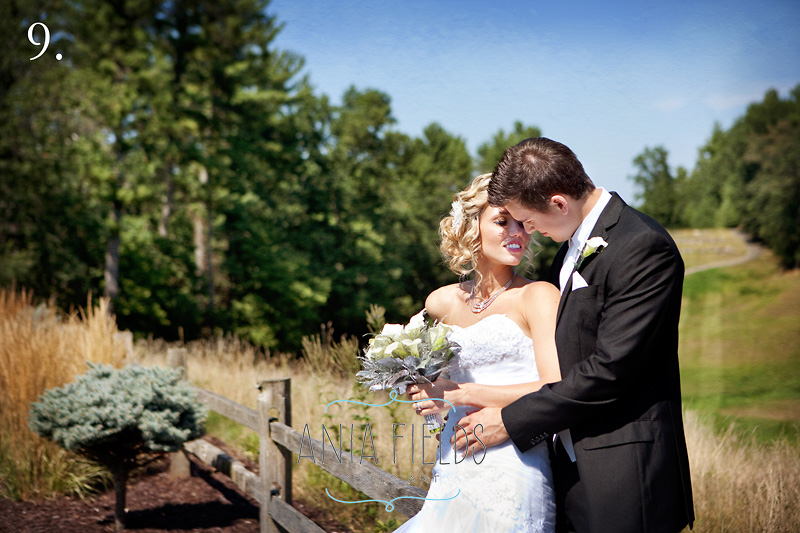
Sometimes love finds you very early in life and even though you are very young, you just know that this is IT. Forever! That happened to Erin and Drew when they first met in sixth grade. Now many years later they are still happily together and ready to commit to each other for life. 🙂 We met at Wisconsin Devil’s Lake State Park to capture their love in winter engagement photos. They drove almost two hours from La Crosse, WI for the session, but they admitted that it was worth it as the weather and the location couldn’t be more perfect. Snow on the trees, stunning winter light and quite warm considering the season. With some help from the wind we even got some snowing pictures! Erin and Drew it was great to meet you! You are perfect together and I can’t wait to get you back in front of my lens in September! Until then…


take a look at more engagement photos
come visit my website
say hello on Facebook
or call me: (608) 643-2642

Learn how to photograph your kids and love it!
Are you sick of taking sub-par pictures of your kids (or other family members?) 🙂 Are your photo albums and scrapbooks full of pictures with red eye, shadows masking their faces, and never looking at the camera? If so I have good news for you! I am going to teach a class at River Arts Center “Learn How To Photograph Your Kids and Love It!” Master the basic elements of photography and learn how to capture your child’s precious moments, whether you are shooting with an expensive camera or not.
When: Sunday, January 26th, 2014, 1 – 3 pm
Where: River Arts Center, 105 9th St, Prairie du Sac, WI
What to bring: notebook to take notes and your camera to help learn about different settings
The workshop is free but the space is limited so pre-registration is required. Here is how to register:
Send an email with your name and telephone number to me: aniafields@frontier.com
or to River Arts Center: RiverArtsPhotoContest@gmail.com
Hope to see you there!
PS. Bring a picture of your child you have taken to enter to win a complimentary portrait session with Ania Fields Photo Art!

The Winners Are… Kendra and Kevin (and Their Beautiful Engagement Photo)
Beloved Portraits , Studio News and Products

Congratulations to Kendra and Kevin!!! You did a great job promoting the contest among your friends and as a result your beautiful engagement photo managed to collect 122 votes and win this year’s prize! A big THANK YOU to all who participated in voting, as well as to those who just stopped by the blog. I hope you liked what you saw. More than 1600 visits over several days is quite an achievement. And here again is the awesome winning couple… And if you want to see more here is a link to more beautiful engagement pictures from their fall session. A few more months and I’ll be photographing their wedding 🙂

take a look at more love and wedding photos
come visit my website
say hello on Facebook
or call me: (608) 643-2642
Love and Joy – The Best of 2013 Photo Contest
Beloved Portraits , Studio News and Products , Weddings

Well, it’s that time of the year again! It’s the first week of 2014 so it means time for all of you to cast your vote in the Best of 2013 Photo Contest. On this one of the coldest days of this winter I thought I’ll try to warm you up with some images reflecting “Love and Joy”. You can see my favorites below, now it’s your turn to choose one winner. 🙂
Who wins?
Couple with the image receiving the most votes.
What is the prize?
One 16×20 standout using an image of their choice taken from last year’s session or wedding.
How to vote for your favorite photo?
1. You can vote for ONE image only.
2. Choose your favorite photo below (one and only!) and vote for it by leaving a comment below this post (just scroll down and click on “leave a comment” link on the bottom of this post under the last photo). In the comment box share the number of your favorite photo and write why you like it most.
3. Bonus vote: You can have one extra vote for the same image. To receive it, just go to my Facebook Page and “like” the page first, to become a fan (if you haven’t done it yet 🙂 ). Then go to the “Best of 2013” photo album and click “like” on the same ONE image you chose in the blog. Votes on Facebook will count only from people who both “like” Ania Fields Photo Art business page AND ALSO left a comment on the blog.
4. Voting closes on Monday January 13th, 2013 at midnight CST. You can still place your votes after that date but unfortunately they won’t count.
Please follow the rules above so that your votes count and of course feel free to share this contest with family and friends. I will do my best to validate and tally up all the votes correctly and will announce the winner next week here on the blog. GOOD LUCK!
And here are the images:


I hope you had fun celebrating with your loved ones the amazing year now behind us. For Ania Fields Photo Art New Year comes with a new logo! I hope you’ll like it as much as I do 🙂 It was designed by Elizabeth Neely (one of my beautiful and talented brides). Thanks Elizabeth! And thank you to my wonderful clients for making 2013 another great year! Here is to even better 2014! Wishing you all the best now and always!
![]()
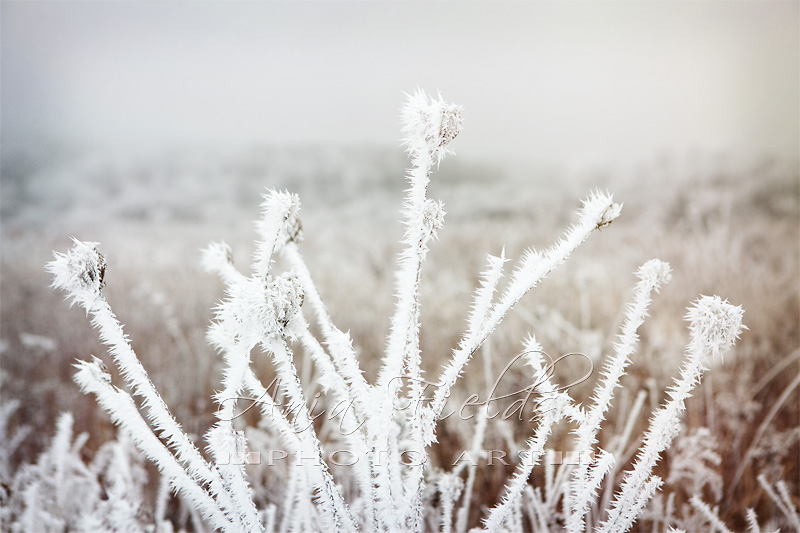
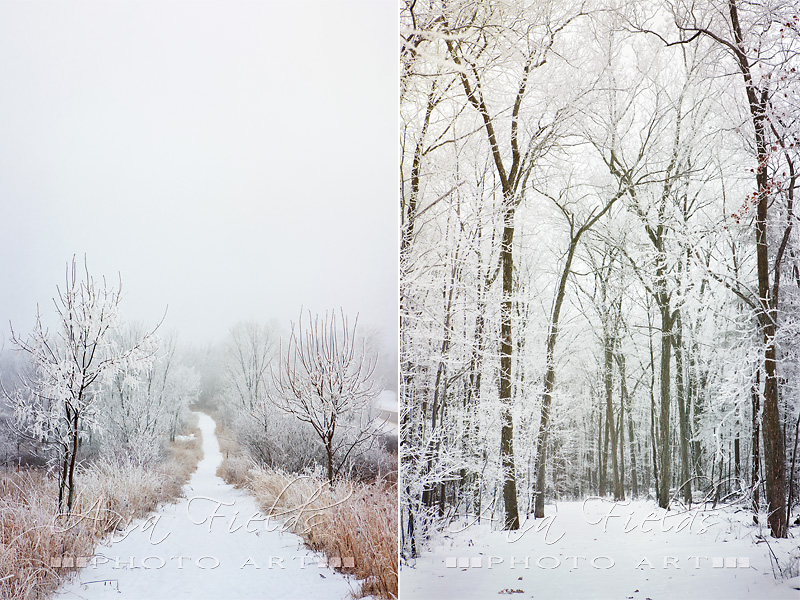
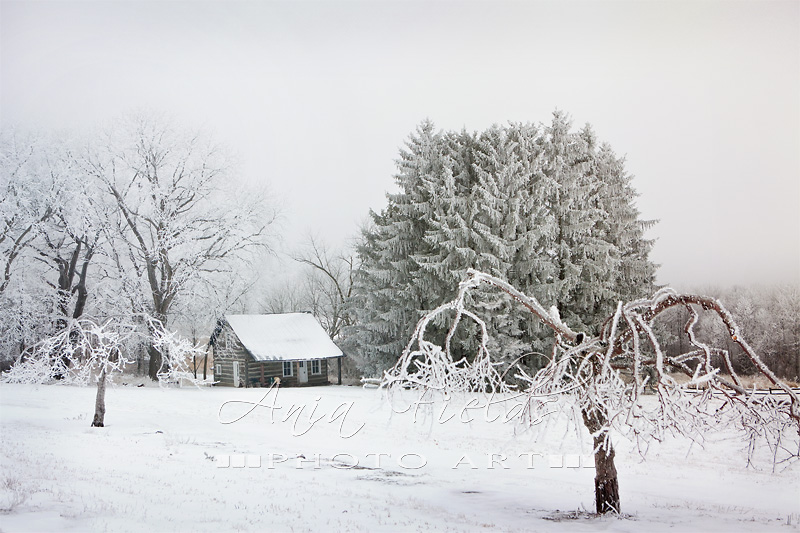
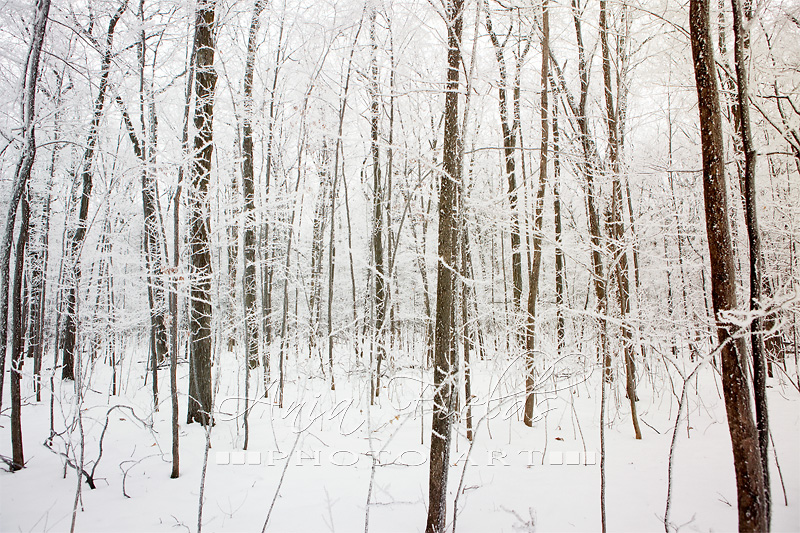
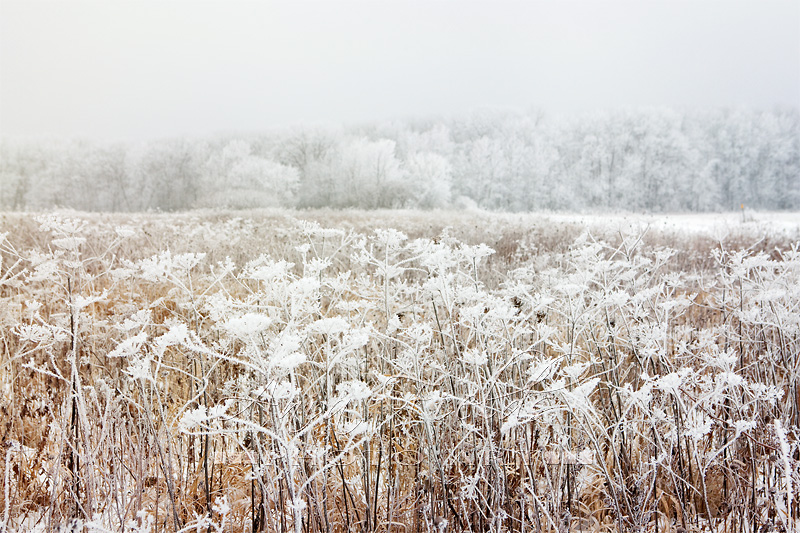
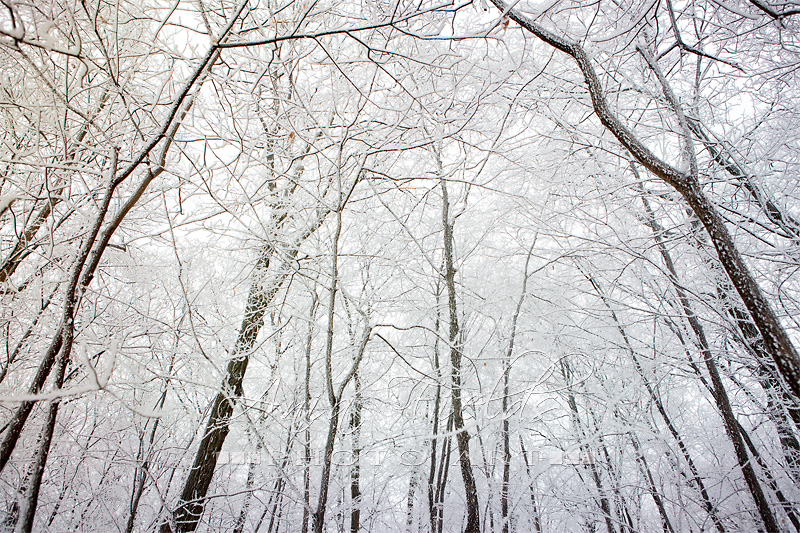
Everyday Magic – Winter in Wisconsin – Winter Solstice Day in Devil’s Lake State Park
Everyday Magic

it’s impossible not to love winter on days like that 🙂
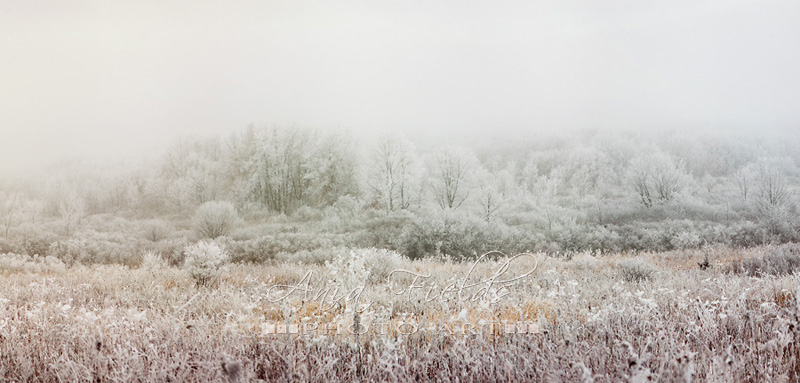
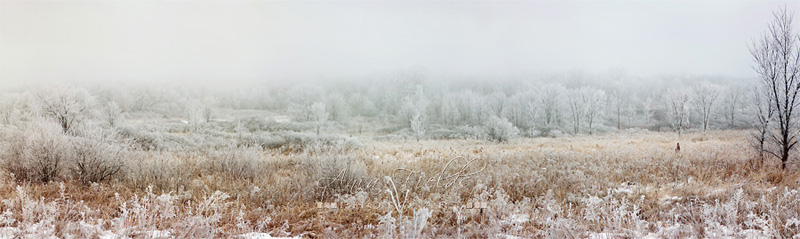
Winter in Wisconsin can be delightfully beautiful sometimes. Yesterday winter solstice brought some magic and turned Devil’s Lake State Park into a winter fairy tale land. Woods, trees and prairies covered in frost seemed enchanted. I didn’t have my camera with me when we first drove by but was able to go back home and return before it got too dark to capture some of this magic to share here with you. Enjoy!
Here is more Wisconsin photos
Click here to see Wisconsin photo gallery


Here is more Wisconsin photos
Click here to see Wisconsin photo gallery

Today I would like to share some beautiful, colorful fall engagement photos full of love. I met with Kendra and Kevin at Devil’s Lake State Park, and it happened that the colors were at their peak that weekend. Everything was golden hued everywhere we looked. It was a perfect background to document their love story. There was so much to capture! Kendra and Kevin are just perfect together. They are tender, funny, caring and full of joy. It seems like they both bring out the best in each other. When they are together you almost feel this huge love bubble around them. Below are a few images from their Devil’s Lake Wisconsin engagement session. Enjoy! It was great to get to know you better and I am so looking forward to photographing your wedding in May. 🙂


take a look at more engagement photos
come visit my website
say hello on Facebook
or call me: (608) 643-2642
Leave A Comment