
Sonia’s Senior Year in Pictures – Madison WI Senior Photographer

Time flies! It seems like it was not so long ago when I would nurse her, deal with toddler tantrums, play tea parties, practice ABCs and teach her how to ride a bike. And now, all of a sudden, my baby girl is a graduating senior and an adult! We just celebrated her 18th birthday… read more
Botwinka – Polish Beet Greens Soup
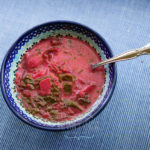
Fall is here and each week our CSA shares from Roots and Shoots farm seem to get more and more abundant. Recently we got a huge bunch of fall beets with large, beautiful, juicy leaves and it inspired me to make one of my favorite beet greens soups called “botwinka” in Polish. This soup has a… read more
Fresh From the Garden – Nettle Pesto Recipe
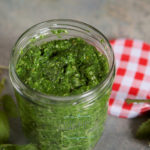
Spring has finally arrived and the world outside is turning bright and juicy green. In our garden we already started harvesting fresh chives, asparagus, oregano and also for the first time – stinging nettle that’s growing by our compost pile. I always knew how powerful and healthy this weed/herb is but never did anything with it until now.… read more
Yummy Dandelion Honey

Every year in early May our lawn gets covered in pretty yellow dandelion flowers. We don’t mind them at all and let them grow freely as we realize the benefits of this amazing plant. They are not only essential for bees survival but also good for people. Roots, leaves and flowers have lots of health benefits.… read more
How to Make Homemade Sauerkraut
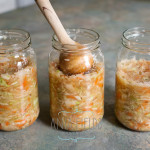
You may or may not know that I’m very passionate about lacto-fermenting whatever I can. Traditionally fermented foods and drinks are the ultimate superfood as they give us lots of probiotics (beneficial gut bacteria). Probiotics not only optimize our gut flora but are also amazingly awesome to overall health. Sauerkraut is one of the most popular lacto-fermented foods… read more
Hikes with Morty – National Puppy Day

Happy National Puppy Day! For some time now, I’ve been thinking about sharing some of last year’s photos from our family hikes with Morty. We don’t know exactly how old Morty is, and he’s definitely no longer a puppy, but still today seemed like a perfect day to share our explorations. With two teenagers at home there are fewer and… read more
Kutia Recipe Polish Christmas Dessert
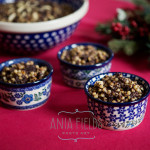
Here is something delicious and sweet on the blog today! I’d like to share with you my kutia recipe – a Polish Christmas dessert. On Thursday we’re going to celebrate our Christmas Eve supper with a group of our local Polish friends. It’s going to be a potluck and everybody is bringing a different traditional dish.… read more
Thank You! – Sauk Prairie WI Photographer

I feel so grateful for you… I wanted to write this post last Thursday but got busy with Thanksgiving preparations (this year we again hosted half of our extended family) and the time flew by. So instead of timing this message with all the other Thanksgiving greetings you received, it’s coming today. Yet this delayed… read more
Chicken Yoga – How to Stretch One Chicken Into Several Meals – Part 2
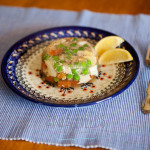
Last week (in part one of this post) I shared with you how easy it is to roast a frozen chicken and make chicken broth. Today I’d like to show you two more fast and easy recipes that use the leftover chicken and the cooked veggies from the stock. The first one is a very… read more
Chicken Yoga – How to Stretch One Chicken Into Several Meals – Part 1
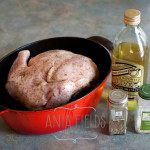
It’s time for some cooking on the blog! Today I’d like to show you how I use one frozen chicken to create several delicious meals. Every summer we stock up our freezer with delicious pastured chickens from our favorite local CSA farm Roots and Shoots. These are birds that live a regular chicken life. They are raised… read more